Dallara IR18
Explore source-backed information and braking guidance for Dallara IR18 in iRacing.
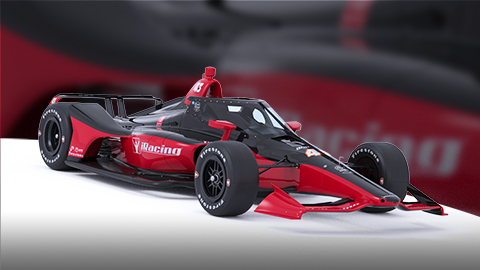
Image © iRacing.com Motorsport Simulations
Quick reference
- Length
- 5,000 mm196.9 in
- Width
- 2,011 mm79 in
- Displacement
- 2.2 L134.3 cid
- Torque
- 410 Nm300 lb-ft
- Power
- 522 kW700 bhp
- Wheelbase
- 3,023–3,073 mm119–121 in
- Dry Weight
- 845 kg1,862 lb
- Wet Weight (with driver)
- 900 kg1,984 lb
- RPM Limit
- 12000 rpm
The Dallara IR18 combines a turbocharged V6 with a hybrid system and track-specific aerodynamic packages. Braking, differential settings and suspension adjustments need to be considered together: a road-course configuration differs substantially from an oval setup. The manual documents both garage adjustments and the controls available while driving.
Braking characteristics
Braking capacity changes with the aerodynamic package. Higher downforce generally permits more brake pressure before a wheel locks; a low-downforce configuration may require less pressure. A pressure setting that works on a road course should therefore be reassessed when changing to a fast oval package.
The suspension also influences wheel loading under braking. Excessive front camber can reduce braking capability. Removing the rear anti-roll bar while using very soft rear springs can lift the inside-front tyre on turn-in, making it prone to locking. More rear low-speed rebound can reduce rear mechanical grip as the chassis pitches forward; the manual distinguishes that mechanical effect from the benefit of controlling the aerodynamic platform.
Brake controls and adjustments
The garage separates overall Brake Pressure from Brake Pressure Bias. Pressure changes the available braking effort; bias determines how much line pressure reaches the front axle. Moving bias forward can add understeer under braking, while moving it rearward can add oversteer. Either extreme may lock the corresponding axle, so the target is strong braking without locking the front or rear wheels.
The cockpit displays the current setting as BIAS. Use that readout to keep track of the chosen distribution rather than confusing it with overall brake pressure. Start with the appropriate iRacing setup and test one adjustment at a time before changing another variable.
Dashboard and driver controls
The centre of the display shows gear, previous lap time, delta and lap count. The left cluster contains MAP, REGEN, front/rear ARB, WJ POS and BIAS; the right shows remaining Push-to-Pass time, fuel, fuel economy, DEPLOY and live tyre temperatures. The upper row illuminates progressively green, yellow and red as RPM rises; once all ten lights are lit, a further increase triggers flashing blue to request an upshift. These lights also flash blue with the pit limiter active, so check the operating mode before interpreting them.
With the pit limiter active, the display has a yellow border: the speed box is green below the limit, yellow at the limit and red above it. Push-to-Pass instead produces a green border and green inner status LEDs. Hybrid status LEDs are red during regeneration and green during deployment. Separate state-of-charge clusters use eight lights: all eight indicate a full supercapacitor, and lights go out as charge falls. Their normal red/yellow/green colour scheme is retained during regeneration; deployment changes the scheme to seven blue positions and one red, while the number lit still represents charge. Do not confuse these hybrid indications with the shift lights.
The caution-status clusters illuminate yellow when a caution period begins. The fuel quantity is displayed in gallons, while economy is shown as MPG or litres per lap; distinguish remaining fuel from the economy reading when checking a stint.
Tyres and operating conditions
Road courses offer Primary and Alternate compounds: the harder Primary trades some grip for life, while the softer Alternate offers more grip and shorter life. The compound choice is not available on ovals. Starting-pressure minimums depend on track type; oval right-side minimums are typically higher than those on the left.
Lower cold pressures generally add grip but also rolling resistance and heat buildup; higher pressures reverse that trade-off. Compare cold and hot readings after a stint to understand how similarly loaded tyres are working. The garage's inner/middle/outer temperatures are carcass measurements, not the same display as live cockpit temperatures. Use them to assess workload and alignment, with tread remaining as a complementary wear check rather than the primary measure of handling balance.
Suspension and chassis
Large ovals and Indianapolis allow a 119- or 121-inch wheelbase; road courses and short ovals use 121 inches. The longer option is more directionally stable, while the shorter is more responsive and sensitive to fore-aft balance changes. Pushrod length adjusts ride height; inspect corner weights and crossweight after asymmetric changes. The displayed ride height is a chassis reference, not necessarily the lowest ground clearance.
On road courses, front and rear third-spring bump stops support heave loads while allowing softer corner springs. Reducing their gap brings engagement earlier, helping prevent bottoming but potentially upsetting the car over rough mid-corner surfaces. They are unavailable on ovals. The oval-only Weight Jacker must be zero for garage inspection; positive adjustments raise the right rear and decrease crossweight, while negative adjustments reverse both effects.
ARB blade positions run from 1, softest, to 6, stiffest, and are adjustable through the F8 black box. A stiffer front bar favours understeer; a stiffer rear bar favours oversteer. Damper low-speed controls address chassis movements, whereas high-speed controls address bumps and kerbs: these describe shaft speed, not car speed. Excessive rebound can prevent a wheel extending quickly enough to retain contact. Preserve mechanical grip as well as platform control when tuning them.
Steering Pinion changes steering speed: more teeth give a quicker, potentially twitchier response; fewer slow it down. Steering Offset recentres the wheel when an asymmetric oval setup needs countersteer on a straight: positive rotates its position clockwise, negative anticlockwise. More Nose Weight generally adds directional stability but can cause understeer; less helps rotation and can add oversteer. The manual relates it to aero balance rather than offering one universal percentage.
Crossweight is the right-front/left-rear diagonal load, but the IR18 readout expresses a front-axle weight difference relative to the left-front. A reading of -100 to the left-front means the right-front carries 100 more in the selected weight units. A lower/more-negative left-front reading means more crossweight, promoting understeer in left turns and oversteer in right turns; the opposite adjustment reverses those effects. Do not interpret this readout as a conventional percentage.
Increasing both pushrod lengths on an axle raises it. Unequal front/rear height changes shift aero balance, while fuel burn raises heights slightly through a stint. At the rear, the garage shows only one height reference but telemetry shows two corner heights: check rear corner weights and telemetry for tilt after asymmetric adjustments. Stiffer front corner springs hold the front aerodynamic platform more firmly but reduce mechanical grip and can cause slow-corner understeer; softer fronts reverse that trade-off. Stiffer rears similarly control the platform but can add slow-corner oversteer; softer rears add mechanical grip with more body movement.
Both ARBs have large, small and disconnected options. Removing a bar greatly reduces that axle's roll stiffness, and its remaining adjustments no longer act through a connected bar. Front Steel blades are stiffer than Titanium blades; this changes stiffness, not weight. Wide (Slow) drop-link positions reduce effective bar stiffness, while Narrow (Fast) increases it. ARB Preload removes unintended static load after setup changes; on ovals it can deliberately manage crossweight through banking transitions. Recheck it after changing the chassis rather than carrying an accidental asymmetric load.
For road courses use negative camber on all four wheels; for ovals the manual describes positive left-side and negative right-side camber, adapted to each tyre's load. Excessive front camber reduces braking grip; excessive rear camber reduces acceleration traction. Front toe-out sharpens turn-in but reduces straight-line stability and increases temperature and wear. Rear toe-in adds stability and reduces rotation; moving towards toe-out reverses that tendency. On ovals, right-rear toe-out with left-rear toe-in can increase yaw and benefit aerodynamics, but may cause on-throttle oversteer.
More positive caster adds steering weight and directional stability but also jacks load towards the inside-front as steering is applied, reducing crossweight and helping mechanical turn-in. The associated roll can hurt aero performance in fast corners. Less caster reverses those effects; negative caster is not allowed. Less positive caster on the left-front than right-front creates a leftward tendency useful on ovals, but increasing caster also adds a little rolling drag.
Higher low-speed compression resists compression more strongly. Mechanically, more at the front adds braking understeer, while more at the rear can reduce acceleration traction and help rotation; both also restrain aerodynamic-platform movement. Higher high-speed compression resists bumps and kerb strikes and helps avoid chassis contact, whereas lower settings absorb rough surfaces better but permit greater aero-platform variation. More front low-speed rebound can add on-throttle understeer; less lets the front retain grip longer. More rear low-speed rebound reduces rear grip under braking, while less retains it during forward pitch. Higher high-speed rebound slows wheel extension after bumps; keep it low enough for the tyre to regain contact. Excessive rebound can cause unloading or oscillation, while very low settings sacrifice aerodynamic consistency.
Aerodynamics
The allowed wing flaps, wickers and diffuser options depend on track type. More front wing shifts balance forward; more rear wing shifts it rearward, with higher angles generally adding both downforce and drag. On large ovals the diffuser sidewalls and strakes must be off. The diffuser's one-inch trailing-edge wicker is available on road courses and short ovals, not large ovals. Rear-wing wicker permissions also differ at Indianapolis; use the options available for the actual circuit rather than carrying a road-course package across unchanged.
Closing the radiator inlets reduces drag and slightly reduces downforce but raises engine temperature. The 77%-closed option is qualifying-only. In the Aero Calculator, front/rear ride height and tilt are reference inputs: changing them does not mechanically change the car. Changing rear-wing angle there does apply to the car. Enter telemetry-based average heights and tilt, compare front downforce percentage before and after adjustments, then make the intended physical changes in the garage. A more forward aero balance promotes oversteer; an unchanged percentage helps preserve balance when changing total downforce.
At the front, road-course rules mandate two upper flaps and ovals one. Wing Mainplane Extension adds front downforce with a little drag. A road-course front wicker is fitted to the uppermost flap; short ovals do not allow one. On large ovals without the mainplane extension, Steps 1–3 cover increasing thirds of the wing span. With the extension fitted, Steps 2 and 3 are unavailable: no wicker gives an inner-half extension, while Step 1 adds the outer extension and wicker for a full-span extension. On large ovals, the endplate angle can rotate by up to 3 degrees either way; increasing it shifts load forward and raises both the available maximum and minimum mainplane angles. This endplate option is unavailable on road courses and short ovals. Negative mainplane angles can still generate some downforce while reducing drag.
Road-course rear wings offer Single Plane and Double Plane configurations. Double Plane adds substantial downforce and drag and shifts balance rearward; Single Plane reduces both and shifts it forward. Ovals permit only Single Plane. Road courses and short ovals allow no rear wicker or a full-span 3/8-inch wicker. Large ovals prohibit a rear wicker except Indianapolis, where a centred 3/8-inch-tall wicker can be 13.2 inches wide, 24.5 inches wide or full span, or removed.
Outside the mandated large-oval package, diffuser sidewalls offer ON, Trimmed and OFF: trimming provides an intermediate downforce level, while removal cuts drag with a large downforce loss. Installing internal strakes increases efficiency, downforce and drag; Z+15 extends them downwards by 15 mm for more downforce. Evaluate these with the calculator rather than considering the wing angles alone.
For the calculator, use the average of the front sensors and the average of the rear sensors for ride heights. Tilt is the difference between mean left-side and mean right-side heights, not a guessed roll angle. Downforce to Drag reports downforce per unit of drag: a higher ratio indicates more downforce for that drag, but a low-drag package may have a lower ratio. Keep the chosen balance target in view when trading total load against straight-line performance.
The June 2026 Season 3 update adds ramp flaps and the Indy 500 body wicker when the IR18 races at Indianapolis Motor Speedway. This is a track-specific addition beyond the January manual, not a package for every circuit; the release note does not specify new adjustment ranges or quantified downforce changes.
Differential and transmission
The sequential gearbox needs no clutch input for shifts. Downshift protection ignores a command that would over-rev the engine, so a rejected downshift is not necessarily an input fault. All six ratios and the final drive are adjustable: larger ratios favour acceleration and reduce achievable speed; smaller ratios do the reverse. Leave engine-speed headroom for slipstreaming and Push-to-Pass when choosing the top gear.
The adjustable differential is available on road and street circuits; ovals use a fixed spool that locks the rear wheels together. More clutch plates multiply locking force. More preload adds locking even during throttle transitions: the manual describes less rotation under braking but more rotation under power. Coast and power ramps tune those phases separately; smaller angles increase locking and larger angles reduce it. Do not transfer these adjustment instructions to the oval spool.
More clutch plates add entry understeer during deceleration and exit oversteer under power; fewer plates reverse those tendencies. Lower coast-ramp angles similarly add braking understeer, while higher coast angles allow more entry rotation. Lower power-ramp angles add on-throttle oversteer; higher power angles add understeer. Use plates and preload for the overall corner, then coast and power ramps to refine its separate phases. After changing a gear or final drive, Apply refreshes the displayed expected gear speeds; final drive changes every gear together.
Engine and electronic systems
Engine map 1 provides full power with the highest fuel use. Maps 2–5 progressively save fuel and reduce power; maps 6 and 7 retain full power with different throttle responses, respectively more linear and more digressive. Map 8 is for caution and pace laps, with a substantial reduction in power and fuel flow. Indianapolis oval also offers a higher-boost mode that increases heat and consumption and is not recommended for race running.
The hybrid controls are separate from those engine maps. Regen Level scales automatic regeneration when lifting off the throttle: 1.0 is full regeneration and 0.5 is half. Deploy Level scales energy delivery during manually activated deployment in the same way. Watch the dedicated hybrid and charge LEDs to distinguish regeneration, deployment and energy remaining; Push-to-Pass has its own remaining-time indication.
The manual also identifies manually activated regeneration, indicated by the same red hybrid-status LEDs as regeneration during deceleration. This is distinct from the Regen Level setting for automatic off-throttle recovery. The supercapacitor's charge display tracks available hybrid energy, whereas OT tracks Push-to-Pass time; neither indicator substitutes for the other. Fuel Level sets the fuel loaded when the car enters the simulation.
Official sources
Stop Guessing, Start Improving
Many drivers slam the brakes with all their strength, but the fastest modulate pressure, use the brake to rotate the car, and exit as fast as possible. Train that skill here.
Train Anywhere, Anytime
Browser-based training works with any racing pedals or controllers. Fanatec, Thrustmaster, Logitech, Simucube — no installation required.
Pro-Designed Exercises
Access exercises created by professional sim racers like Suellio Almeida. Learn the exact braking patterns used by the fastest drivers.
Import Dallara IR18 Telemetry
Drop your Garage61 lap CSV and extract braking data for every corner. Generate personalized practice exercises based on YOUR telemetry, not generic patterns.
Track Your Progress
View session history, performance trends, and best scores. Watch yourself improve over time and stay motivated to practice.
And There's Much More
Improve your braking technique with this car and much more:
Create Custom Exercises
Build from templates, draw brake curves, or record with your pedal
Schedule Your Training
Plan practice sessions and track your consistency across weeks
Brake Master Ratings
Earn rankings and compete on leaderboards as you improve
Exercises & Progress Tracking
Practice exercises and track your progress completely free.
No install needed • Works in browser
General practice tips
Tip 1
Starting point
Start with the official setup and consult the simulator documentation for available controls. Appropriate brake bias depends on the car and conditions.
Tip 2
One variable
Change one setting at a time and compare several laps. Record the change and observed behavior before keeping it.
Tip 3
Comparable conditions
Compare similar fuel loads, tires and track conditions. One lap alone does not establish that a setting is better.
Frequently asked questions
General guidance for practicing and consulting car-specific sources.
Where can I find settings for the Dallara IR18?
Where can I find settings for the Dallara IR18?
How should I compare a setup change?
How should I compare a setup change?
How can I practice pedal control?
How can I practice pedal control?
Explore MoreOther Cars
Similar cars you might be interested in learning
Ready to Master the Dallara IR18?
Put this knowledge into practice with Braking Lab's interactive brake training exercises. Import your telemetry and get personalized feedback.