NASCAR O'Reilly Cars
Explore source-backed information and braking guidance for NASCAR O'Reilly Cars in iRacing.
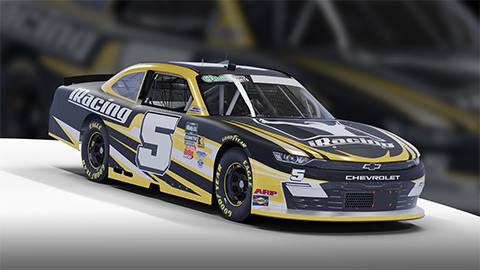
Image © iRacing.com Motorsport Simulations
Car family image
Quick reference
- Chassis type
- Double wishbone independent front, live axle truck arm rear
- Power unit type
- Naturally aspirated steel block pushrod V8
- Length
- 4,953 mm195 in
- Width
- 1,803 mm71 in
- Wheelbase
- 2,794 mm110 in
- Dry weight
- 1,556 kg3,430 lb
- Wet weight with driver
- 1,631 kg3,596 lb
- Displacement
- 5.86 L358 cid
- Torque
- 678 Nm500 lb-ft
- RPM limit
- 9000 RPM
- Power
- 503 kW675 bhp
- Engine power (restrictor plate)
- 336 kW450 hp
This shared manual covers the Chevrolet Camaro, Ford Mustang and Toyota Supra NASCAR O'Reilly cars. A naturally aspirated V8, H-pattern gearbox and fixed splitter/spoiler geometry put the focus on throttle control, mechanical balance and maintaining aerodynamic ride heights; the dashboard layout differs by manufacturer.
Brake controls and adjustments
Front Brake Bias is the percentage of braking force sent to the front brakes: above 50% the front receives the larger share, below 50% the rear does. Tune it to the track and driver rather than interpreting that dividing point as a recommended setting. The manual describes braking and coasting through the middle of corners, followed by careful throttle application on exit.
Rear-wheel hop can also come from the drivetrain or suspension. Downshifting too early or without enough throttle blip can mismatch engine and wheel speed and cause a spin. Higher Truck Arm Mount positions reduce hop under heavy braking but reduce rear grip and increase rear steer and anti-squat; lower mounts reverse those effects. This is a chassis trade-off, not another brake-bias control.
Dashboard and driver controls
All three dashboards show engine speed, oil and coolant temperature, oil and fuel pressure, and charging voltage. Chevrolet and Ford also show cooling-system pressure; Toyota does not. Their layouts and pit-light placement differ: Camaro and Mustang use a central LED array, while Supra places the LEDs around the tachometer rim.
There is no speedometer or pit-speed limiter. Pit LEDs are calibrated automatically for each track and are valid only in second gear. Yellow means below the limit; green approaches the limit, with all seven green lights on Chevrolet/Ford or ten on Toyota indicating the limit itself. Red indicates speeding. The separate shift warning turns the tachometer backlight red with the pit LEDs off, distinguishing it from a pit-speed warning.
Oil and water temperature warnings turn red in a dangerous range. Overheating in traffic may require leaving the draft to cool the engine; persistent overheating requires reviewing cooling configuration or reducing engine speed.
Tyres and operating conditions
Cold Air Pressure is the initial tire pressure. Higher pressures reduce drag and heat but decrease grip; lower pressures increase drag and heat but enhance grip. Adjust cold pressures based on track characteristics, with lower values for road courses or oval left-side tires, and higher for oval right-side tires due to greater loads. Last Hot Pressure and Last Temps indicate tire performance and handling balance; consistent pressure buildup across similar tires is ideal. Tread Remaining helps identify alignment issues or handling balance. On ovals compare right-front with right-rear pressure growth, and left-front with left-rear; on road courses compare across each axle. Use the three tread-temperature zones and remaining tread together to assess alignment, rather than treating wear alone as a load measurement.
Suspension and chassis
Moving ballast forward raises Nose Weight and directional stability; moving it rearward helps rotation. Cross Weight loads the right-front and left-rear diagonal: increasing it generally stabilizes entry and adds drive-off grip, while reducing it frees the car in the corner. Diagnose entry, middle and exit in that order: an exit slide may originate in mid-corner understeer, so blindly adding crossweight can make both phases worse. The manual uses tyre temperatures after a clean run to check that diagnosis and suggests more crossweight for hotter tracks, less for cooler conditions.
Increasing Spring Perch Offset lowers the corner and reduces its static load. Before changing heights or crossweight, note ARB preload, disconnect the front bar and add positive Link Slack to keep it unloaded. Adjust perches in coordinated small steps, then reconnect the bar and restore the original preload. A larger front ARB adds roll stiffness and mechanical understeer. Arm Asymmetry biases its effect towards the right-front but also adds resistance to vertical travel; positive Link Slack delays engagement.
Front Shock Spring Rate controls the auxiliary spring once contacted. Adding packers engages it sooner and raises dynamic front height; removing them delays engagement. Keep left/right packer values reasonably close: excessive imbalance can load the ARB and raise the opposite corner rather than curing roll. Use the bar or left-rear spring to manage roll. At the rear, the right spring primarily controls height; a softer left-rear frees the chassis, while a stiffer one tightens it.
Right-rear coil binding requires a spring below 400 lb/in on tracks longer than one mile, excluding Gateway and superspeedways. Travel to Coil Bind is measured from tech-height spring length, not necessarily garage height. More travel lowers the dynamic rear height before binding; less travel raises it. Truck Arm Mount can extend the usable height range, followed by resetting the perch and retesting. Reset truck-arm preload near zero after chassis changes.
Higher LS compression resists driver-induced compression; lower values improve bump absorption but permit more body movement. HS compression addresses fast shaft movement over bumps and kerbs, not vehicle speed. Higher slope settings are more linear for rough surfaces; lower settings more digressive for smoother tracks. Tune slope before the high/low-speed settings. More rebound slows extension, but excess can unload a tyre. Higher track-bar height adds rear roll stiffness and oversteer; a right end higher than the left adds exit oversteer, while the opposite split aids exit traction.
Front toe-out sharpens turn-in at a cost in stability and wear. More caster increases steering weight and straight-line stability; less left-front caster makes the car pull left on ovals. Use positive left/negative right camber on ovals and negative camber all round on road courses, balancing lateral grip against braking grip and tyre life. Rear toe-in adds stability but slows direction changes. A lower steering ratio needs less steering-wheel movement; Steering Offset recentres the wheel for comfort.
Aerodynamics
The splitter and rear spoiler geometry are not adjustable, but their performance depends on chassis attitude. The manual's splitter target and minimum ideal clearance is around 0.25 in (just over 6 mm), measured at its leading-edge centre by CFSRrideheight. Going BELOW 0.25 in causes aerodynamic stall and a major downforce loss; actual ground contact can unload the front tyres and cause heavy understeer. Do not confuse the garage chassis-height reference with splitter clearance.
Rear downforce peaks around 4.5–5.0 in (114–127 mm) of rear ride height. Going higher adds little downforce but substantial drag; going lower reduces both and risks underside damage. Choose a setup for the same track type to pass inspection: superspeedway and short-track chassis/body configurations differ. Front shock springs, packers and ARB settings must work together to hold the target attitude rather than chase the lowest possible ride height.
Differential and transmission
The car utilizes an H-pattern transmission, requiring the clutch only for starting and stopping in gear. For upshifts, lift the throttle and select the next gear. For downshifts, blip the throttle while selecting a lower gear to prevent wheel hop. The Rear End Ratio, the ratio between the driveshaft pinion and differential ring gear, is fixed or offers two choices on ovals with NASCAR-sanctioned events. Higher ratios provide better acceleration but lower top speed, while lower ratios reduce acceleration but increase top speed.
Engine and electronic systems
The NASCAR O'Reilly cars are powered by a 358 cu in (5.8 liter) pushrod V8 engine. With restrictor plates, power is 450 hp; without them, it ranges from 650-700 hp. The tachometer indicates RPM limits. Grill tape configuration offers two options: 'Race' for open radiator cooling and 'Qual' for fully blocked cooling to reduce drag and increase downforce. The 'Qual' setting, unavailable in race sessions, causes rapid engine overheating. Engine temperature gauges (oil and water) turn red if values are in a dangerous range, signaling potential damage.
Official sources
Stop Guessing, Start Improving
Many drivers slam the brakes with all their strength, but the fastest modulate pressure, use the brake to rotate the car, and exit as fast as possible. Train that skill here.
Train Anywhere, Anytime
Browser-based training works with any racing pedals or controllers. Fanatec, Thrustmaster, Logitech, Simucube — no installation required.
Pro-Designed Exercises
Access exercises created by professional sim racers like Suellio Almeida. Learn the exact braking patterns used by the fastest drivers.
Import NASCAR O'Reilly Cars Telemetry
Drop your Garage61 lap CSV and extract braking data for every corner. Generate personalized practice exercises based on YOUR telemetry, not generic patterns.
Track Your Progress
View session history, performance trends, and best scores. Watch yourself improve over time and stay motivated to practice.
And There's Much More
Improve your braking technique with this car and much more:
Create Custom Exercises
Build from templates, draw brake curves, or record with your pedal
Schedule Your Training
Plan practice sessions and track your consistency across weeks
Brake Master Ratings
Earn rankings and compete on leaderboards as you improve
Exercises & Progress Tracking
Practice exercises and track your progress completely free.
No install needed • Works in browser
General practice tips
Tip 1
Starting point
Start with the official setup and consult the simulator documentation for available controls. Appropriate brake bias depends on the car and conditions.
Tip 2
One variable
Change one setting at a time and compare several laps. Record the change and observed behavior before keeping it.
Tip 3
Comparable conditions
Compare similar fuel loads, tires and track conditions. One lap alone does not establish that a setting is better.
Frequently asked questions
General guidance for practicing and consulting car-specific sources.
Where can I find settings for the NASCAR O'Reilly Cars?
Where can I find settings for the NASCAR O'Reilly Cars?
How should I compare a setup change?
How should I compare a setup change?
How can I practice pedal control?
How can I practice pedal control?
Explore MoreNASCAR Cars
Similar cars you might be interested in learning
Ready to Master the NASCAR O'Reilly Cars?
Put this knowledge into practice with Braking Lab's interactive brake training exercises. Import your telemetry and get personalized feedback.