Porsche 911 Cup (992.2)
Explore official-source information about the Porsche 911 Cup (992.2) in iRacing.
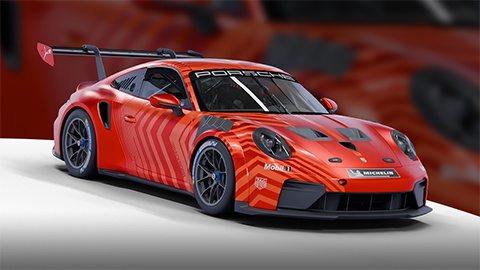
Image © iRacing.com Motorsport Simulations
Quick reference
- Chassis Type
- Double Wishbone Front, Multi-Link Rear
- Engine Type
- Naturally-Aspirated Flat-Six
- Length
- 4,600 mm181.1 in
- Width
- 1,920 mm75.6 in
- Wheelbase
- 2,469 mm97.2 in
- Displacement
- 4 L244 cid
- Torque
- 470 Nm347 lb-ft
- RPM Limit
- 8,750 RPM
- Power
- 388 kW520 bhp
- Dry Weight
- 1,288 kg2,840 lb
- Wet Weight (with driver)
- 1,481 kg3,266 lb
The Porsche 911 Cup (992.2) combines a naturally aspirated flat-six with adjustable ABS and traction control. Its relatively small setup menu makes brake-pad friction, axle balance, ride height and rear wing particularly important. This guide explains the controls and operating references in its own manual, without carrying over assumptions from earlier Cup versions.
Braking characteristics
Brake feel depends on pad friction as well as pressure bias. More front bias can make the car harder to rotate under braking; too much rear bias makes the braking phase unstable. The manual gives 48–52% as an expected working range only with delivery-spec pads on both axles, not as a universal target.
Negative camber trades longitudinal braking grip for lateral cornering grip. When increasing front negative camber, reassess brake balance rather than assuming the previous setting still suits the front tyres. With ABS disabled, magenta side LEDs identify front-wheel locking and yellow LEDs rear-wheel locking; a red triangle warns that ABS is off.
Brake controls and adjustments
ABS has eleven intervention levels: 1 provides the least support and 11 the most; 0 switches it off. Brake Pressure Bias is adjustable while driving. A higher percentage sends more pressure forward, potentially improving stability but increasing front-locking tendency.
Front and rear Brake Pad Mu select friction characteristics. Higher mu produces more braking force but makes lockups easier and modulation harder; lower mu allows more pedal input, especially when driving without ABS. Pads also change dynamic balance as they heat and cool. The manual gives an example, not a fixed conversion rule: changing front mu from 0.58 to 0.53 may require moving pressure bias forward by as much as 2.5 percentage points to recover a similar feel. Recheck the actual balance after a pad change.
These controls depend on the event rules: NoABS disables ABS, NoTC disables traction control and NoABSTC disables both. PMNA also disables traction control. Where ABS is enabled, the June 2026 update allows the wheels to lock during a spin or backward travel to keep the trajectory predictable; normal driving operation is unchanged.
Dashboard and driver controls
Race 1 shows ABS/TC and throttle-map settings, engine temperatures and pressures, speed, gear, lap information and tyres. Race 2 replaces the left-hand engine group with fuel used, fuel per lap, fuel pressure and fuel level. Quali prioritises lap time and splits. The race pages display brake bias as an offset from 50%, so 54% appears as 4.00 and 48% as -2.00; an adjustment bar also shows its direction.
The centre contains live tyre pressures and the outer corners show surface temperatures. With the pit limiter active, the centre changes to gear and speed: green means at or below the limit and red means above it; the upper speed box becomes an RPM display. Blue side LEDs indicate active traction control and override any wheel-lock lights. Display Page selects the page; DIM and MUL are inoperative. TC Mode is selected automatically by the fitted tyre type, not an independently chosen wet/dry mode.
Tyres and operating conditions
Use slicks for dry conditions and wet tyres for rain. Lower starting pressure favours grip but increases heat generation and rolling drag; higher pressure sharpens response and reduces rolling drag at the cost of grip. After a stint, compare hot and starting pressures to assess each tyre's workload.
Temperatures measured inside the tread are available back in the garage: compare both shoulders to inform alignment and the centre against the shoulders to assess pressure. Remaining tread percentage helps estimate tyre life. Do not confuse these readings with the live surface temperatures on the dashboard.
The manual suggests the permitted minimum pressures as a starting reference for most tracks; on very long straights, such as Le Mans, a small increase may reduce rolling drag and heat generation. It does not provide a universal pressure for every condition.
Suspension and chassis
The suspension uses double wishbones at the front and a multi-link layout at the rear. ARB numbers are not a linear stiffness scale. From softest to stiffest, the front order is 1–2–3–4–7–5–6 and the rear order is 1–2–3–4–5–7–6. The baseline is front 3/rear 4. A stiffer front bar adds understeer; a stiffer rear bar adds oversteer. Bars are the primary low-speed balance adjustment and a secondary tool at higher speeds.
Front toe-out improves initial response but can overslip the inside tyre and create scrub mid-corner. At the rear, only toe-in is available: more improves stability under braking and power, but slows response and can add mid-corner understeer and rolling drag. Rear toe is specified per wheel, unlike the combined front adjustment. Keep left and right values equal as a normal starting point.
Negative camber increases lateral capability while reducing braking or traction capability; excessive values also shorten tyre life. The manual favours more negative camber for short races, but recognises braking, traction and endurance trade-offs. Cross weight is the right-front plus left-rear share of total static weight. Around 50% supports symmetric road-course handling only when the rest of the setup is symmetric.
Increasing spring perch offset lowers that corner; decreasing it raises it. Equal changes left and right alter an axle's ride height while preserving equal corner heights and avoiding a deliberate cross-weight change; they do not preserve the previous ride height. Diagonal adjustments are used to alter cross weight. Recheck ride heights after changing fuel, since this can cause a setup to fail inspection.
Aerodynamics
The rear Wing Setting refers to the angle of attack of the rear wing, which significantly impacts total downforce and drag, as well as shifting aerodynamic balance rearwards with increased angle. A higher wing angle provides more total cornering grip in medium to high-speed corners but reduces straight-line speed. The expected operating range for the wing is 0 to 12 degrees; 0 degrees is suited for low-downforce tracks like Daytona, and 12 degrees for higher-downforce tracks like Hungaroring.
Rear wing angle should be adjusted in conjunction with front and rear ride heights, specifically the rake (difference between front and rear ride heights). To maintain the same overall aerodynamic balance while adding downforce, the car's rake must be increased when increasing the rear wing angle. Increasing rear ride height will decrease rear and overall downforce, and increase drag, but allows more weight transfer across the rear axle. Reducing rear ride height increases rear and overall downforce while reducing drag and weight transfer across the rear axle.
The manual gives 72 mm front and 106 mm rear as minimum inspection ride heights and favours operating as low as permitted without excessive ground contact. Front height may need to be raised at extreme tracks such as the Nürburgring. These are garage reference measurements, not a guarantee of clearance everywhere on track.
Differential and transmission
The current iRacing transmission reference lists a six-speed semi-automatic sequential gearbox. Upshifts do not require lifting the throttle or using the clutch. Downshifts need neither clutch nor a manual throttle blip; the system waits for an appropriate engine speed. Use paddles or a sequential control rather than an H-pattern shifter. The clutch is needed to move off from a stop unless anti-stall clutch assistance is engaged.
Engine and electronic systems
The engine is a naturally-aspirated flat-six. The RPM limit is 8,750 RPM. Shift lights indicate optimal upshift points: 7900 rpm for 1st gear, 8200 rpm for 2nd, 8400 rpm for 3rd, 8500 rpm for 4th, and 8600 rpm for 5th. In 6th gear, lights indicate approaching maximum allowable engine speed, with blue flashing lights at 9000 rpm signaling the absolute maximum. Engine speeds above 8750 rpm in 6th gear are permitted on tracks with exceptionally long straights but will reduce engine service life.
The TC Mode setting tailors the Traction Control system parameters to conditions, with a Wet setting allowing less slip than the Dry setting. This changes automatically with tire type during a pitstop. The TC Setting controls intervention levels (1-11 assistance, 0 disables). The Throttle Setting adjusts the pedal map; Setting 1 is moderate, Setting 2 is more aggressive. Fuel Level in the garage sets the amount of fuel, and a Fuel Low Warning can be configured to alert the driver at a specified level.
A traction-control toggle is available below pit-road speed for disabling TC when recovering a spun car. The red system-warning triangle lights when this toggle is enabled. Event rules can disable TC regardless of its normal adjustment range.
Official sources
Stop Guessing, Start Improving
Many drivers slam the brakes with all their strength, but the fastest modulate pressure, use the brake to rotate the car, and exit as fast as possible. Train that skill here.
Train Anywhere, Anytime
Browser-based training works with any racing pedals or controllers. Fanatec, Thrustmaster, Logitech, Simucube — no installation required.
Pro-Designed Exercises
Access exercises created by professional sim racers like Suellio Almeida. Learn the exact braking patterns used by the fastest drivers.
Import Porsche 911 Cup (992.2) Telemetry
Drop your Garage61 lap CSV and extract braking data for every corner. Generate personalized practice exercises based on YOUR telemetry, not generic patterns.
Track Your Progress
View session history, performance trends, and best scores. Watch yourself improve over time and stay motivated to practice.
And There's Much More
Improve your braking technique with this car and much more:
Create Custom Exercises
Build from templates, draw brake curves, or record with your pedal
Schedule Your Training
Plan practice sessions and track your consistency across weeks
Brake Master Ratings
Earn rankings and compete on leaderboards as you improve
Exercises & Progress Tracking
Practice exercises and track your progress completely free.
No install needed • Works in browser
General practice tips
Tip 1
Starting point
Start with the official setup and consult the simulator documentation for available controls. Appropriate brake bias depends on the car and conditions.
Tip 2
One variable
Change one setting at a time and compare several laps. Record the change and observed behavior before keeping it.
Tip 3
Comparable conditions
Compare similar fuel loads, tires and track conditions. One lap alone does not establish that a setting is better.
Frequently asked questions
General guidance for practicing and consulting car-specific sources.